

LED mirror strips are versatile lighting solutions designed to enhance mirror aesthetics, providing ambient or task lighting․ They are easy to install, energy-efficient, and ideal for modern home or makeup mirror setups․
1․1 What Are LED Mirror Strips?
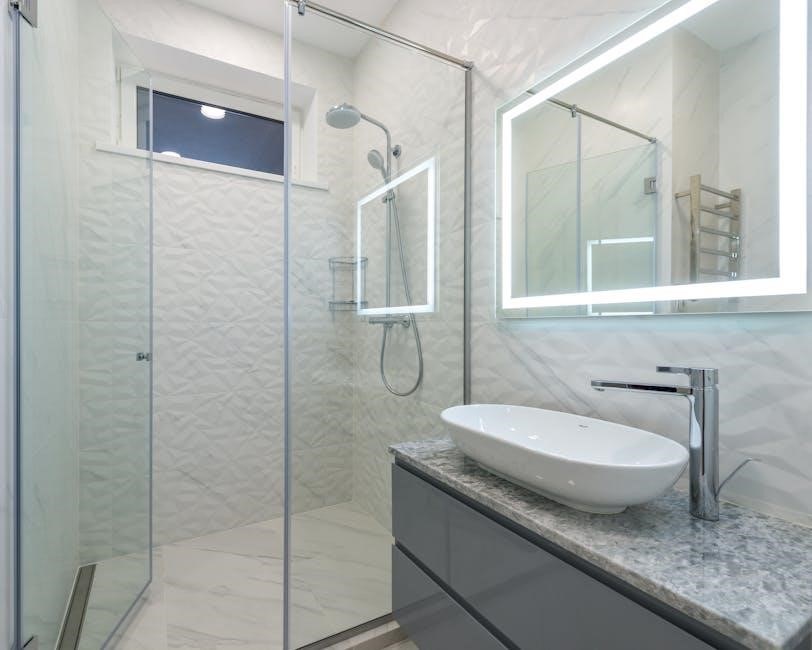
LED mirror strips are flexible, adhesive lighting solutions designed to enhance mirrors with ambient or task lighting․ They consist of LED chips mounted on a flexible PCB strip, often with a self-adhesive backing for easy installation․ These strips are energy-efficient, dimmable, and available in various colors, making them ideal for creating a modern, illuminated mirror effect․ They are commonly used in bathrooms, makeup stations, and decorative setups to add a sleek, professional finish․ Their versatility allows them to be placed on framed or frameless mirrors, curved or straight edges, and even behind frames for a subtle glow․
1․2 Benefits of Using LED Strips for Mirrors
LED mirror strips offer numerous advantages, including energy efficiency, long lifespan, and customizable lighting options․ They enhance the aesthetic of mirrors, creating a modern, illuminated effect․ LED strips are versatile, suitable for framed or frameless mirrors, and can be installed on curved or straight edges․ They provide task lighting for makeup or grooming while adding ambient light for a stylish decor․ Easy to install and dimmable, LED strips are a practical and elegant solution for upgrading any mirror setup, ensuring a professional and polished appearance․
Preparing for Installation
Begin by cleaning the mirror surface and ensuring it is dry․ Measure the perimeter to determine the LED strip length needed, adding extra for curves or corners․
2․1 Gathering Necessary Tools and Materials
To install LED strips for your mirror, gather essential tools and materials: a tape measure, scissors or a cutting tool, a pencil for marking, and a power source․ Ensure you have the correct LED strip length, adhesive backing, and any additional mounting hardware like spacers or clips․ For frameless mirrors, consider adding a border for a polished look․ Organize all items beforehand to streamline the installation process and avoid delays․
2․2 Measuring the Mirror for LED Strip Placement

Accurately measure the mirror’s dimensions to determine the LED strip length needed․ Use a tape measure to assess the perimeter, adding extra for corners or curves․ For framed mirrors, measure the frame’s inner edge․ For frameless mirrors, consider adding a border, leaving about 1 inch of space around the edges․ Mark the placement area lightly with a pencil to guide installation․ Ensure the LED strip fits snugly without excess, achieving a seamless and professional appearance․
Installation Steps
Install LED strips by peeling the adhesive, attaching them evenly, and connecting to a power source․ Ensure secure placement and test functionality for optimal results․
3․1 Cutting the LED Strip to the Right Length
To ensure a seamless fit, measure the mirror’s perimeter and add a small margin for corners or curves․ Use scissors or a utility knife to cut the strip at the marked lines․ Avoid stretching the strip during cutting, as this may damage the LEDs or wiring․ Once cut, double-check the length before proceeding․ This step is crucial for a professional and even installation, ensuring the lighting complements the mirror’s design without excess material․
3․2 Attaching the LED Strip to the Mirror
Start by cleaning the mirror surface to ensure proper adhesion․ Peel the backing from the LED strip and attach it to the mirror, aligning it with your desired placement․ For framed mirrors, you can install the strip over the frame or on the back․ Press the strip firmly to secure it․ If needed, use a small amount of superglue for extra stability, especially for frameless mirrors․ Attach the strip slowly, removing the backing as you go to prevent air bubbles․ Ensure the strip is evenly aligned and pressed firmly for a secure hold․
3․3 Installing on Framed vs․ Frameless Mirrors
Framed mirrors allow LED strips to be installed directly over the frame or on the back for a sleek look․ For frameless mirrors, attach the strip 3-4 inches from the edges or add a border for a polished finish․ Ensure the surface is clean and dry for proper adhesion․ Use spacers if necessary to avoid damage․ Leave about one inch of space on all sides for frameless mirrors․ This ensures a seamless and professional installation, enhancing both functionality and aesthetics․
3․4 Connecting the LED Strip to a Power Source
Connect the LED strip to a power source using the provided adapter or controller․ Ensure the connector is securely attached to the strip’s terminal․ If using a dimmer or remote, connect it between the strip and the power source․ Turn off the power before connecting to avoid electrical hazards․ Test the lights after connection to confirm proper functionality․ For frameless mirrors, ensure the power source is discreetly placed to maintain a sleek appearance․ Always follow the manufacturer’s wiring instructions for safety and optimal performance․
3․5 Testing the Installation
Turn on the power source and test the LED strip to ensure all lights are functioning properly․ Inspect the adhesion to confirm the strip is securely attached to the mirror․ Check for any gaps or uneven lighting․ Verify that the dimmer or remote control works smoothly if installed․ Ensure the colors and brightness are consistent across the strip․ If any issues arise, such as flickering or uneven adhesion, address them immediately․ Proper testing ensures a professional finish and reliable performance of your LED mirror setup․
Maintenance and Troubleshooting
Regularly clean the LED strip and mirror to maintain brightness․ Check for loose adhesion and reconnect if necessary․ Address flickering or dimming by ensuring proper power connections․
4․1 Cleaning the LED Strip and Mirror
Cleaning the LED strip and mirror regularly ensures optimal brightness and longevity․ Use a soft, dry cloth to wipe away dust and grime․ For tougher spots, dampen the cloth with water or a mild cleaning solution․ Avoid harsh chemicals or abrasive materials that could damage the LEDs or mirror surface․ Gently remove any adhesive residue or smudges․ Regular cleaning prevents dimming and maintains a clear, polished appearance․ Ensure the mirror and strip are dry to prevent water spots․ This simple maintenance step keeps your setup looking its best․
4․2 Common Issues and Solutions
Common issues with LED mirror strips include poor adhesion, uneven lighting, or connectivity problems․ For adhesion issues, ensure the surface is clean and dry․ If the strip detaches, reattach it firmly or use additional adhesive․ For uneven lighting, check if the strip is properly aligned and evenly spaced․ Connectivity problems can be resolved by inspecting wires for damage or loose connections․ Avoid exposing LEDs to water, as this can damage the components․ Regular maintenance and proper installation can prevent most issues, ensuring long-lasting performance and aesthetics․

Enhancing Your LED Mirror Setup
Enhance your LED mirror setup with stylish borders or dimmers for adjustable brightness․ Consider remote controls or color-changing options to create a modern, customizable look easily․
5․1 Adding a Border for Frameless Mirrors
For frameless mirrors, adding a border with LED strips creates a sleek, modern look․ Ensure the strip is placed 1-2 inches from the edges, leaving uniform space․ Use a border kit or attach strips directly, securing with adhesive or clips․ This enhances visibility and adds a decorative touch, making the mirror a focal point in any room․
5․2 Using Dimmers or Remote Controls
Enhance your LED mirror setup with dimmers or remote controls for adjustable brightness and color․ These accessories offer convenience, allowing you to customize the lighting to suit your mood or task․ Most LED strips are compatible with dimmers, enabling smooth transitions between bright and ambient settings․ Remote controls add a modern touch, letting you adjust lighting without physical interaction․ This feature is ideal for creating a relaxing ambiance or ensuring optimal illumination for makeup application․ Start with medium brightness and tweak as needed for the perfect setting․

Safety Tips
Ensure proper adhesion to avoid electrical hazards and prevent strips from falling․ Keep LED strips away from water and moisture to maintain safety and functionality․
6․1 Ensuring Proper Adhesion
Proper adhesion is crucial for a secure and long-lasting LED strip installation․ Clean the mirror surface thoroughly to remove dirt, oils, or moisture․ Peel the backing slowly, pressing the strip firmly along the edge․ For frameless mirrors, consider adding a small border or using a spacer for better grip․ Avoid using additional adhesives unless necessary, as they may damage the mirror․ Ensure the surface is dry and free of contaminants to prevent the strips from detaching over time․
6․2 Avoiding Electrical Hazards
To ensure safety, always use a certified power source and avoid exposing LED strips to water․ Keep connections secure and away from moisture․ Turn off power before installation or maintenance․ Never overload circuits or use damaged cables․ Avoid touching electrical components with wet hands․ Regularly inspect wires and connections for wear․ Mount strips on heat-resistant surfaces to prevent overheating․ Follow manufacturer guidelines for voltage and current ratings․ Proper installation and maintenance will minimize electrical risks and ensure long-term reliability․
Creative Ideas for Placement
Enhance your space by placing LED strips along the back of framed mirrors or creating a border for frameless designs․ For curved mirrors, wrap strips around the edges to highlight the shape․ Rectangular mirrors can feature strips along the top, bottom, or sides for a modern look․ Experiment with spacing and angles to achieve unique lighting effects that complement your room’s aesthetic․
7․1 Placing Strips on the Back of the Frame
Placing LED strips on the back of a framed mirror adds depth and creates a subtle glow․ For framed mirrors, install strips behind the frame to avoid visibility․ Use adhesive backing for easy attachment․ Ensure the frame is wide enough to conceal the strips․ This method works well for both flat and ornate frames․ Clean the frame surface beforehand for optimal adhesion․ This placement enhances the mirror’s appearance without overwhelming the space, offering a sleek, professional finish․ It’s ideal for modern or traditional decor․
7․2 Enhancing Curved or Rectangular Mirrors
LED strips perfectly complement both curved and rectangular mirrors, adding a modern touch․ For curved mirrors, gently bend the strip along the edges, ensuring it follows the contour․ For rectangular mirrors, align the strips with the length or width for a sleek look․ When installing on curved surfaces, cut the strip into smaller sections for better flexibility․ Adding extra length to the strip ensures proper adhesion around corners․ This method enhances the mirror’s shape, creating a contemporary and visually appealing effect that highlights its unique design․
LED mirror strips offer a sleek, modern way to enhance any space․ Easy to install and energy-efficient, they provide a professional finish and lasting style․
8․1 Final Tips for a Professional Finish
For a polished look, ensure the LED strip is evenly spaced and securely attached․ Clean the surface before installation to guarantee proper adhesion․ Avoid overbending the strips, especially around corners․ Use a dimmer or remote for adjustable lighting․ If unsure, consider consulting a guide or professional for optimal results․ Regular maintenance, like dusting and cleaning, will keep your LED strips shining brightly for years to come․